Greetings all! We just expanded out internet reach by getting on Twitter and Pininterest. You can follow us there for more exciting news and pictures of what we're up to!
Twitter: @CountryCityMink
Pinterest: CountryCityMink
Saturday, April 28, 2012
A Project for those Funky Vintage Ties
 |
| Groovy ties from Goodwill |
Oh, Vintage.....times when people made somewhat dubious choices when it came to fashion. Like polyester...who thought that was a great idea?! But, I must say of all the polyester clothing items, vintage polyester ties take the cake...Just look at those color combinations....right? Teal and orange. Brown and yellow (only bought because I have cute hat that matches the color scheme...I bet my sweetie would want to color match me at a swinging party, right?).
Note the great diagonal stripe pattern mixed with paisleys and dots, love it! Now, most of my vintage ties went into my tie skirt (THE easiest piece of clothing you will ever make).But, what to do with all those leftover pieces of the tie? Well, I made mine into buttons and bracelets.
The buttons are extremely easy, just get a button making kit from your local craft or fabric store, some glue and some pins..and you have one of a kind buttons...
 |
| Buttons that would be at home on any jacket or bag! |
 |
| Almost done! |
 |
| This zebra strip button matches up perfect with the tie |
And now you have lots of cool tie-wear for your wrists!


Tuesday, April 17, 2012
A Titan-ic Vintage Find of the Week
I am hoping to make this a weekly (more probably monthly) little ditty about a deal or unusual item found while out and about. So here is the first issue of "Vintage Find of the Week"...
What is it about owls? They seem to be popping up everywhere; cookie jars, wall hangings, tea pots, salt and pepper shakers and in our Vintage Find of the Week.....
What is it about owls? They seem to be popping up everywhere; cookie jars, wall hangings, tea pots, salt and pepper shakers and in our Vintage Find of the Week.....
 |
| Meet "Bubo" the Owl |
Made in the 1960's under the moniker, "Midnight Owl" this guy is a transistor radio. Looks an awful lot like Bubo from the original Clash of the Titans, right? Even though he didn't come in a box and needs a bit of shine put back into him, I think he's fantastic. He works too! I can pick up the news radio, baseball games and a lot more.
What do you guys think? I've already gotten some crazy offers for this little guy, but I think that I may keep him around a bit.
Hey, I need something to go with my owl earrings......
Sunday, April 15, 2012
Hope Springs Eternal
 |
| Apparently Mary is growing tiny people in her garden... |
In the waning days of April, our thoughts turn towards the garden. Actually our thoughts were turning toward the garden as soon as the seed catalogues came in the mail and we started dreaming about making our own version of Mozza's squash blossom pizza, vegetable fritters of all kinds, fresh tomatoes, zingy radishes, multi-colored carrots....mmmm...just thinking about it now makes us itch to get out the potting soil and rake. Patience is needed in gardening. You have to wait until the last frost wanders through and then there's the occasional hail storm or heat wave that can truly wreck the garden. We're not even going to mention the deer, rabbits, squirrels, raccoons, birds and whatever other animal that decides to nibble their way through your vegetable patch.
So, while you wait until that perfect weekend to start your planting, here are some great books about vegetables that will satisfy your appetite....
 |
| photo from Amazon |
To sum up Michael Pollan's book, "Eat food. Not too much. Mostly plants." Simple, right? The book expands on those seven simple words with sound advice. You don't eat foods third graders or your great-grandmother wouldn't be able to pronounce or have a clue as to what they are. You should avoid foods with added anything, or foods that claim to be something that they aren't. I can't picture what a xanthan gum or mono-anything plant would look like, so I am certainly not going to be eating it. You should avoid foods that will never rot, foods that are served through a window, or foods that are made in a plant (foods that are a plant are okay).
Now some of you are probably thinking that this is impossible or saying that you like that Big Mac. The key to everything is moderation. But, do you really think that eating something that makes your milk turn a different color at the breakfast table is a good thing?
Pollan's rules also included that we should try and eat more like the French. Think about it, wine and bread and all those fancy pastries; but when was the last time you saw an obese Parisian? They key to the French diet is more in portion sizes and not snacking during the day than it is to what the actual product at the dinner table is. Also, that they stop eating when they are full. This isn't like when you were growing up and had to finish what was on your plate.
The main message we took out of it is this; You should enjoy your food and the experience of preparing it. Eat at a table with actual silverware and plates (small plates, do not use a platter for a dinner plate). Eat with friends or family. If you can, make your meal and sweets from scratch. You will enjoy them more and savor them. Lastly, don't obsess over ingredients or calories. You can break the rules every once and awhile. Food should be enjoyed.
 |
| Photo from Amazon |
Rebecca Rupp's book, "How Carrots Win the Trojan War" gives those mostly forgotten or hated veggies their day in the sun. She traces the vegetable patch from asparagus through the lowly turnip from antiquity to the present with sense of humor and level of detail that could only come in handy to the most haughty gardener (or a rather strange night of Trivial Pursuit). Here's some of our favorites....
The red stripes in Betsy Ross's flag were dyed with beet juice. The cabbage inspired water-reppelant sprays. Queen Anne of Denmark challenged her ladies in waiting to see who could make a piece of lace as fine as the flower of the wild carrot (she won and the flower was named after her). Lettuce was used to make early versions of latex. Some people think that it was the potato that led to Eve's downfall. The jack-o-latern comes from a man's botched deal with the Devil. Radishes in Ancient Rome could grow up to 40 pounds and were used to punish those who committed adultery. Spinach is slang for "stuff and nonsense". The tomato was considered poisonous by many due to it belonging to the nightshade family. The turnip may be unloved by most, but what how many other veggies have their own Brother's Grimm tale?
All in all, the book is a fun romp through history and may even give you a recipe or too (if you have some spare pigeons laying about.
 |
| photo from Amazon |
Lastly is Nigel Slater's "Tender", which managed both to be a cookbook and a how to in the garden. Note that Nigel is English so there are some vegetables that are absent from the plate. This is a great book for the gardener who is starting out. There is ample instruction on how to plant, where to plant and feeding/watering tips. The recipes are delicious too! The chocolate beet cake with creme fraiche has hardly any of that earthy taste that shows up in most beet recipes. There is a pasty recipe that would be right at home in Suzanne Collin's Hunger Games series (the pasty was taken down to the mines to appease the spirits, and for a fine lunch).
I will be sure to update with garden pictures and recipes. Happy planting!
Tuesday, April 10, 2012
Black vs White IPhone
Oh, the cell phone upgrade....the time for new technology and feeling like you're on the cutting edge of the newest gadget (the feeling lasts for all of five minutes- for a breakdown of this cycle see The Oatmeal).
To better streamline things and because Mac has all of the good apps, I thought I'd go with an I Phone. The only choice was camera with or without Siri ( that one also has a better camera) and color. I've never really had a choice about phone color before and I was leaning towards white because a black phone with a white cord is not aesthetically pleasing to the eye (for shame on Apple in not fixing this design flaw!) However......
The guys selling me the phone said "You'll want a white one, all girls get the white one."
Reeeeeeeallllly???? I do not like people telling me what I can and can't do, so naturally, out of spite, I went with the black one. I told them of my white cord/ black phone conundrum and the fact that a black phone won't show dirt as much.
Feeling happy with my decision I went on my way. I also thought how small minded to assume that girls would want a white phone. For what reason? Then I began to notice it....Every girl I saw with an I Phone or I Pad...all white.......
Any guy I saw...black..."tactical black" as one told me.
Now since when did white become such a girly color? Is Apple trying to play Golf's card of a black and red motif on their cars to tie into James Bond's Walther PPK gun? (This is very much true- the Golf GTI and the Tizio lamp played upon the PPK's black and red (the safety) color scheme). In "The Language of Things" author Deyan Sudjic suggests that the reasoning behind this marketing scheme is to lend an air of suppressed violence to the object and that it, "suggests that you can do important things with it".
I know, all that from just one phone purchase and people wonder why I don't watch Mad Men. So fellow readers, black or white? And why?
Saturday, April 7, 2012
Have a Fabulous Faberge Easter
Happy Easter to all! We love decorating Easter eggs here at Country Mink/ City Mink, but hard boiled eggs can get kind of boring after awhile... So we were super excited to pick up some Faberge Egg Stencils from Fancy Flours. We used their recipe for no spread sugar cookies and royal icing along with a charming copper egg cookie cutter. We also picked up some luster dust, disco glitter, drags, pearls....lots of sparkly stuff that any Russian Zsar would love to have on the dessert tray at tea time. Here's some of our creations!
 |
| Chicago Flag Egg |
 |
| Fish Scale Egg |
 |
| Giraffe Wearing a Pearl Necklace Egg |
 |
| Budget Conscious Coronation Egg |
 |
| Rose-less Rose Trellis Egg for the Allergy Sufferer |
 |
| Hot Air Balloon Egg |
 |
| Pink Pinecone Egg |
Sunday, April 1, 2012
DIY Matthew Williamson Designer Scarf
Having to cut back on luxuries is par for the course in this economy. Sometimes, you see an item that just screams "Buy me", and prudently you have to fight not to give into temptation.....right?
Or, you can just work some magic and make something that is just close enough to haute couture that your friends won't be able to tell the difference.
 |
| The scarf that inspired it all By Matthew Williamson Picture from "How to Spend It" Financial Times |
Well, its's a good thing we took al those fashion classes in school and know all about fabric dyeing and painting. We made our own DIY version for less than it takes to fill up the tank of your car. Now that's saving money! We aren't yet out of then holiday season, with Easter and Mother's Day coming up; so this beauty would make a fine present and you'll be sure to get, "Oh, you shouldn't have!" (the good kind, not the diamond encrusted underwear kind).
Supplies
-You can sew your own silk scarf or you can save time and money by ordering from Thai Silks
-Rit Dye (We bought Tangerine and Black-powdered not liquid)
-Salt
-Crock Pot or Metal Pot (Use something you picked up at Goodwill, you won't be cooking in this)
-String (we used some white bamboo yarn leftover from a knitting project)
-PVC Pipe (from your local hardware store)
-Paintbrush or Sponge
-Gloves (so you don't dye your hands)
You want to get your day bath ready first. Get your crock pot (or pot) and fill it with water. You want enough water that the fabric can move freely (this is more important when dyeing large quantities of fabric). Add some of the tangerine dye to the water and some table salt. The amount of dye will determine the punch of color, so use your judgement or have a couple of white cotton pieces of fabric to do some test swatches. We dipped our edges first.
 |
| Dipped top and bottom of scarf |
 |
| Dipping the sides of the scarf. |
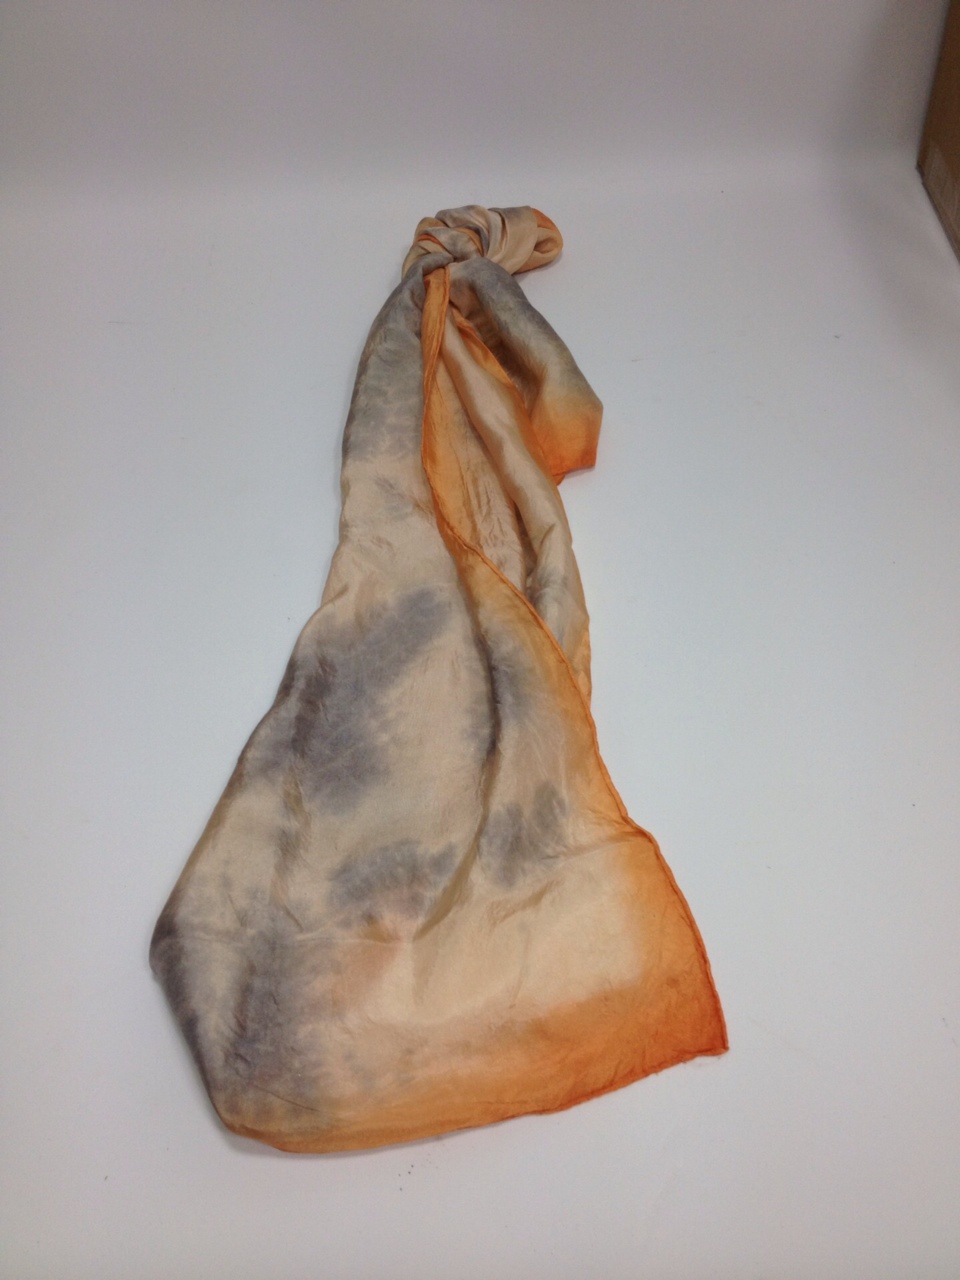
Next, you want to dye the body of the scarf. Using the same dye bath, we put the entire scarf in and swirled it around for a few minutes. Again, the longer it sits in the dye, the deeper the color. We don't want a very deep color.
 |
| Scarf in the dye bath |
 |
| A scarf prepped for dyeing |
Prepare another dye bath, this time using black instead of tangerine. Now for the application, either using a brush or a sponge ( I prefer sponge) apply the black dye within the lighter orange color on the scarf. When you have your dye applied, let it set in for a bit. Wash the dye out of the scarf while it is still wrapped! When the water runs clear, then you can unwrap the scarf and give it a final rinse. You can let the scarf air dry, or pop it in the dryer on the delicate setting. Lightly iron to remove wrinkles and ...
Voilà! A hip, hand made scarf in the color of the year.
Subscribe to:
Comments (Atom)